It's the week after Thanksgiving, which means that I'm back in Las Vegas attending the 18th Annual Autodesk University. Today is dedicated to special meetings, including a press and blogger briefing that is just getting started.
I'll be posting as much information as possible this week...basically whatever I can tell you about that isn't under non-disclosure. So stay tuned.
Monday, November 28, 2011
Thursday, March 25, 2010
Autodesk Announces Features in 2011 Products
I'm in San Francisco today at Autodesk's headquarters to attend the live webcast introducing the company's new 2011 products. I'll be reporting throughout the day on both the Revit products and AutoCAD. For my AutoCAD coverage, visit my other blog at http://cadman-do.blogspot.com/.
The top features announced for the Revit products are:
The top features announced for the Revit products are:
- An interactive sunpath tool
- Large team workflow enhancements
- New surface rationalization tools
- Adaptive components
Here's a brief video demonstrating the new interactive sunpath tool. While many of these capabilities were available in previous versions, users now have the ability to visualize the position of the sun within the context of the model.
Within the realm of large team workflow enhancements, users can now control visibility of components across linked projects and tag items such as doors and rooms from in multiple linked project files from within a host file.
Surface rationalization tools and adaptive components enhance the user's ability to model complex components. This brief video shown just now during the webcast shows how adaptive components can be used to model complex curtain walls.
Friday, November 13, 2009
Creating an Eyebrow Dormer in Revit Architecture
Autodesk University is just a few weeks away. To help whet your appetite, I thought I would share a sneak peek at one of the functions you'll learn in my upcoming class "Raising the Roof: Creating Roofs in Revit."
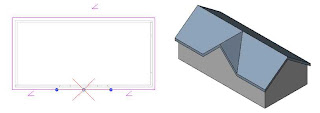
Revit's Slope Arrow tool provides a way to create more complex roofs by defining slopes that cannot be created by simply setting roof footprint boundary lines as slope-defining. For example, this quick (1-minute) video shows how to use the Slope Arrow tool to quickly create an eyebrow dormer.
I hope you enjoyed the video and learned something new about Revit.
You'll learn this and much more about roofs in my AU class "Raising the Roof: Creating Roofs in Revit" (course AB322-1), which I'll be teaching on Thursday, December 3, from 5:00 to 6:30pm in MB Ballroom A.
Sunday, September 13, 2009
Looking Forward to Autodesk University 2009
I'll be back at Autodesk University again this year. At this point, I've lost track of how many of these events I've attended other than the fact that I've been to ALL of them.
I'll be teaching two Revit courses and three AutoCAD classes this year. The Revit classes should be quite interesting:
Collaborating Across Disciplines with Revit Architecture, MEP, and Structure
Tuesday, December 1, 8:00am-9:30am (course: AB104-3)
Class Description: Are you ready to take the next step and use building information modeling to share data across the entire design team? The need for sharing data across design disciplines has become increasingly critical. In this class, we’ll look at how the Revit platform facilitates collaboration and coordination among architects and engineers. You’ll learn how to link project files between Revit Architecture, Revit Structure, and Revit MEP, coordinate work between disciplines, identify and correct interferences, and use Revit’s revision tracking to keep track of changes.
Raising the Roof - Creating Roofs in Revit
Thursday, December 3, 5:00pm-6:30pm (course AB322-1)
Class Description: Roofs are one of the most complex architectural elements to model, but with Revit you can create just about any type of roof. This class will explore the best methods for creating various types of roofs using all the tools in Revit. We’ll look at complex roofs with varying pitch, offset plate heights, ridge and valley control, dormers, flat roofs, and more. You’ll also learn how to create roofs with varying thickness using shape editing tools. Whether you design residential or commercial buildings, you’ll learn new techniques you can immediate put to use in Revit.
I hope you'll join me at AU. To learn more, please visit the Autodesk University website.

Saturday, July 4, 2009
Sorry for the Long Absence
You may have noticed that I have been conspicuously absent since May 4.
There are several reasons for that. One is that I have been totally immersed in creating training videos for CADLearning for their AutoCAD, AutoCAD LT, and Revit Architecture courseware.
The second is that I've been trying to find either a job or some consulting work.
And the third is that we suffered a huge tragedy. On May 20, my son's fiancee was killed by a roadside bomb in Afghanistan.
I've included a bit more detail on my personal CADMAN-do blog.
I'll still be gone for a while, as I'm off tomorrow to the Black Rock Desert in Northern Nevada to watch the team from North American Eagle test the vehicle that they hope will someday break the Land Speed Record. You can follow that story on CADMAN-do as well.
Tuesday, March 3, 2009
First Look: Revit 2010 Ribbon Bar Interface
This morning I received word from Autodesk that I had permission to start sharing videos of the soon-to-be-released Revit Architecture 2010.
So, with no further delay, here for your enjoyment and enlightenment is a short video highlighting some of the features of the new ribbon bar interface.
I hope you will agree that, while the new interface is going to take a while to get used to, it is actually quite intuitive. As I wrote in my pervious posting, it has taken me just an hour or so to become quite comfortable with the ribbon bar.
Saturday, February 28, 2009
Autodesk Unveils Revit Architecture 2010
On Friday, February 6, Autodesk held a virtual press conference at which the company unveiled new versions of its software products for the architecture, engineering, and construction industries. An archive of that virtual press conference is currently available online. If you haven't seen it yet, I encourage you to watch it, particularly part one of the product presentation.
Since lots of other bloggers have already weighed in on the event and reprinted the press release, I'm not going to spend time rehashing what's already been posted. Yes, the next release has a new conceptual design environment, and once I'm able to get my hands on the software and play around with those new tools, I'll write about them.
But let's focus instead about the one aspect of the next release that has everyone talking—the new User Interface.
Ribbon Bar Rant
Here's the image that Autodesk included as part of its press kit.
 The first thing you'll notice is the new ribbon bar. What that means is the absence of the Design bar and the pull-down menus. I'm not going to miss the pull-downs. Does anyone really use them very much in Revit?
But the removal of the Design bar means that initially, you're going to be searching for your tools. Autodesk's press release says that the new "streamlined user interface helps users find favorite tools and commands faster, locate lesser used tools more efficiently and discover new tools more easily." Really?
Here's my take. Of course you're not going to find your favorite tools faster. They're no longer where you normally find them because the Design bar is gone. Nor will you locate lesser used tools more efficiently. They were in the drop-down menus, which are also gone. You will discover new tools more easily. That's the whole idea behind the ribbon bar.
Ribbon Bar Reality
Okay. Now that I've gotten that out of my system, let's talk about what we do now. If you use Revit on a regular basis, it's probably going to take you a day to get used to the new interface. That's all. After that, you're probably going to wonder how you ever lived without it.
Why? Because it makes a lot of sense in this product. The ribbon bar arranges the tools based on your current task. Take a closer look at the Home ribbon bar in the image supplied by Autodesk. There are more tools than what you would have found on the Basic design bar. No more having to switch to the Modeling design bar when you're ready to create railings, ramps, or stairs. They're all here in one place.
Also notice the tooltip in that image. Just like in AutoCAD 2009, when you hover over any tool, a small tooltip becomes visible. Leave your cursor there for more than a few seconds and that tooltip expands to show you more information about the command. That's going to make learning about and using other tools much easier.
And that ribbon bar has lots more tricks. If you watch the demos in Autodesk's virtual press conference (about 10 minutes into Presentation PT1), you'll notice that when Kelcey Lemon goes to select a curtain panel to add to the building form he created using the conceptual modeler, he sees a graphic representation of each panel system in the ribbon bar drop-down (which apparently takes the place of the Type Selector from earlier releases).
Assuming that metaphor extends to all Revit components, that means that you'll now be able to see a graphic representation of the wall, door, window or other component in the selector drop-down as you make your choice. No more having to depend just on the name assigned to the component. If that won't help users make the proper selection the first time, I don't know what will.
Like I said, I'm anxiously awaiting a copy that I can play with and write about. As soon as I receive it, I'll start recording and posting short videos explaining how to use all the new tools. Until then, take a deep breath and think about embracing the ribbon bar.
And if anyone has comments to share, I'm listening.
Subscribe to:
Posts (Atom)
