This morning I did a webcast on View and Visibility Control in Revit, "Seeing what you want to see."
For those of you who may have missed that webcast or who wish to watch it again, you can now view the complete webcast on my website at http://www.dscohn.com/speaking/revit_views.htm
Tuesday, January 22, 2008

Thursday, December 13, 2007
Raising the Roof
On Thursday, November 15, 2007, I did a presentation for the Seattle Revit User Group (SEARUG) on creating roofs in Revit Architecture. The presentation was based on similar presentations that I've done at several AUGI CAD Camp events over the past several months.
I recorded that presentation using Camtasia and am now making it available.
To view the video, please visit my website at http://www.dscohn.com/speaking/revit_roofs.htm
I recorded that presentation using Camtasia and am now making it available.
To view the video, please visit my website at http://www.dscohn.com/speaking/revit_roofs.htm
Tuesday, November 27, 2007
News from Autodesk University
It's been a busy week at AU. Since I'm here speaking on many topics, not just Revit, and since there's always lots of news and activities to write about, I'm posting only to my more general CADman-do blog. Please visit that blog for the latest information from Autodesk University.
I'll be back after the AU break with more Revit-specific information, including tips and tricks that I learn in the many Revit classes I'm taking at Autodesk University.
I'll be back after the AU break with more Revit-specific information, including tips and tricks that I learn in the many Revit classes I'm taking at Autodesk University.
Wednesday, November 14, 2007
Tag Doors by Type / Tag Windows by Mark
How do you tag doors by Type rather than by Mark; or tag windows by Mark rather than by Type?
Again, this is a question that comes up quite often, so let's explain this one in very simple terms.
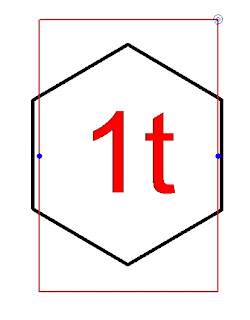
The information that appears in a door or window tag, as well as the appearance of the tag itself, is determined by the Revit annotation family object used to tag the door or window. By default, doors tags appear as an oval with the Mark (door number) centered in the tag, while window tags appear as a hexagon with the window Type centered in the tag.
In order to tag doors so that the Type appears in the tag rather than the Mark, or to tag windows so that the Mark appears in the tag rather than the type, you need to load a different annotation family component and use it instead. It just so happens that Revit Architecture comes with an alternate window tag that does just this. For doors, you'll need to create a new tag that uses the Type rather than the Mark. But this is quite easy to accomplish.
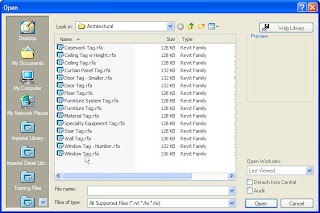
As with most things in Revit, it's easier to take an existing family component and modify it rather than creating a new one from scratch. Open the existing door or window tag by selecting File > Open and then navigate to the library folder in which the tag is stored (by default, door and window tags are located in Imperial Library > Annotations > Architectural).
The tag opens in Revit's family editor. Select the label.
On the Options bar, click the Select Parameter button.

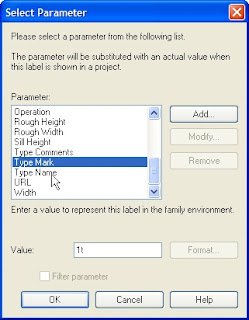
In the Select Parameter dialog, select the parameter you want to assign to the label. For example, to create a door tag that labels the door using the Type rather than the Mark, select Type Mark. In the Value field, enter a value to represent the label within the family editor environment. Then click OK.
Select File > Save As and give your new tag an appropriate name (such as Door Tag by Type.rfa) and click Save. Then close the family editor.
To use your new tag, load it into your project (File > Load From Library > Load Family).
That's all there is to it. Pretty simple, huh?
Again, this is a question that comes up quite often, so let's explain this one in very simple terms.
The information that appears in a door or window tag, as well as the appearance of the tag itself, is determined by the Revit annotation family object used to tag the door or window. By default, doors tags appear as an oval with the Mark (door number) centered in the tag, while window tags appear as a hexagon with the window Type centered in the tag.
In order to tag doors so that the Type appears in the tag rather than the Mark, or to tag windows so that the Mark appears in the tag rather than the type, you need to load a different annotation family component and use it instead. It just so happens that Revit Architecture comes with an alternate window tag that does just this. For doors, you'll need to create a new tag that uses the Type rather than the Mark. But this is quite easy to accomplish.
As with most things in Revit, it's easier to take an existing family component and modify it rather than creating a new one from scratch. Open the existing door or window tag by selecting File > Open and then navigate to the library folder in which the tag is stored (by default, door and window tags are located in Imperial Library > Annotations > Architectural).

The tag opens in Revit's family editor. Select the label.

On the Options bar, click the Select Parameter button.

In the Select Parameter dialog, select the parameter you want to assign to the label. For example, to create a door tag that labels the door using the Type rather than the Mark, select Type Mark. In the Value field, enter a value to represent the label within the family editor environment. Then click OK.

Select File > Save As and give your new tag an appropriate name (such as Door Tag by Type.rfa) and click Save. Then close the family editor.
To use your new tag, load it into your project (File > Load From Library > Load Family).
That's all there is to it. Pretty simple, huh?
Making Roof Lines Visible in Floor Plans
How do you make a roof overhang appear as a hidden line in a floor plan for a level below the roof?
This question keeps coming up, so I figured the best thing to do was to cover it here. While this is by no means the only solution, it is perhaps the easiest way to accomplish this.
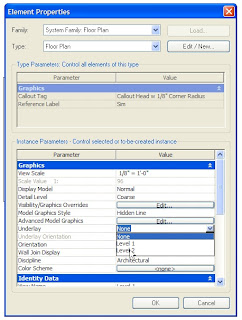
In the plan view of the level in which you want to see the roof line, display the Element Properties dialog box for the view. Then, in the Graphics area, in the Underlay drop-down, select the level on which the roof was created to display the roof as an underlay. (Yes, I realize that the roof is probably above the level you're working on, but it's still considered an underlay nonetheless.)
This makes the roof line visible in the plan view of the level you are working on (along with any ridges and valleys), but of course the lines appear as solid lines.
To change the edges to some sort of hidden line select the Linework tool on the Tools toolbar. Then, select the desired linetype from the Type Selector drop-down. I generally choose.
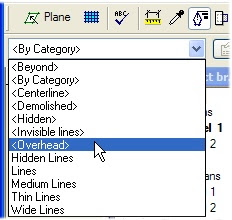
Click on each roof edge line to change the linetype. To hide ridge and valley lines, you can choose from the Type Selector and then click on those lines, or simply go back to the Element Properties dialog box for the view and change the underlay back to "None."
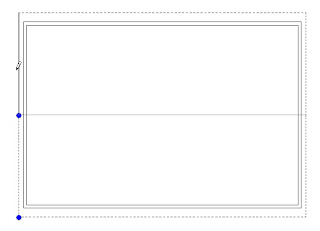
That's all there is to it.
See. It's quite easy once you know how.
This question keeps coming up, so I figured the best thing to do was to cover it here. While this is by no means the only solution, it is perhaps the easiest way to accomplish this.
In the plan view of the level in which you want to see the roof line, display the Element Properties dialog box for the view. Then, in the Graphics area, in the Underlay drop-down, select the level on which the roof was created to display the roof as an underlay. (Yes, I realize that the roof is probably above the level you're working on, but it's still considered an underlay nonetheless.)

This makes the roof line visible in the plan view of the level you are working on (along with any ridges and valleys), but of course the lines appear as solid lines.
To change the edges to some sort of hidden line select the Linework tool on the Tools toolbar. Then, select the desired linetype from the Type Selector drop-down. I generally choose

Click on each roof edge line to change the linetype. To hide ridge and valley lines, you can choose

That's all there is to it.
See. It's quite easy once you know how.
Sunday, October 21, 2007
Revit Quick Tips
The little things can certainly trip you up in Revit. Here are a couple of quick tips.
When importing a CAD file (such as an AutoCAD drawing) for use as the basis of a site plan or topo, be sure the Current View Only check box is NOT selected. Otherwise, you won't be able to select the drawing for use in creating a topo surface.
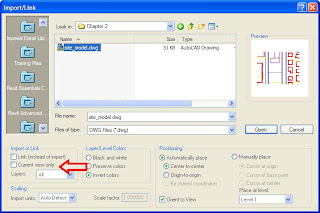
However, the opposite is true when importing or linking a CAD drawing for use within a drafting view. In order for the CAD file to be visible in the drafting view, it SHOULD be imported or linked to the Current View Only.
Also, remember that after placing the CAD drawing in the view, you can move it to the foreground or background by selecting it and then choosing the desired option on the Options bar.

Paying attention to these small details can help you avoid some frustration.
When importing a CAD file (such as an AutoCAD drawing) for use as the basis of a site plan or topo, be sure the Current View Only check box is NOT selected. Otherwise, you won't be able to select the drawing for use in creating a topo surface.

However, the opposite is true when importing or linking a CAD drawing for use within a drafting view. In order for the CAD file to be visible in the drafting view, it SHOULD be imported or linked to the Current View Only.
Also, remember that after placing the CAD drawing in the view, you can move it to the foreground or background by selecting it and then choosing the desired option on the Options bar.

Paying attention to these small details can help you avoid some frustration.
Saturday, September 29, 2007
Download the Handouts
I'm now two weeks into the fall AUGI CAD Camp season and have had the pleasure of presenting Revit classes in St. Louis, West Palm Beach, Indianapolis, and Tulsa. The reception I've received in all four cities has been wonderful, and even more impressive has been the number of attendees. Last year, many of the Revit classes had less than a dozen attendees. This year, most of the classes have had more than 40 people. In Tulsa this week, we ran out of seats in the meeting room in which the Revit classes were held.
We also ran out of some of the handouts. For that reason (and also so that attendees can get extra copies of my handouts to share with coworkers back at the office), I have posted copies of all of my handouts on my website (www.dscohn.com). While I certainly invite you to visit my website to see all of the other goodies posted there, I'm including the links below so that you download the PDF versions of the Revit handouts directly:
I'm developing additional classes for upcoming CAD Camps and will post those Revit-specific titles on-line as well once they are completed.
We also ran out of some of the handouts. For that reason (and also so that attendees can get extra copies of my handouts to share with coworkers back at the office), I have posted copies of all of my handouts on my website (www.dscohn.com). While I certainly invite you to visit my website to see all of the other goodies posted there, I'm including the links below so that you download the PDF versions of the Revit handouts directly:
I'm developing additional classes for upcoming CAD Camps and will post those Revit-specific titles on-line as well once they are completed.
Subscribe to:
Posts (Atom)
