Today, let's look at how you set the zero level in a project and display absolute elevation levels.
For example, suppose that Level 1 in your project is actually at 355-feet above sea level. Rather than physically moving the Level 1 datum up to 355'-0", you simply want it to display the actual elevation.
This is really quite easy to do. First, set the true project elevation by doing the following:
- Open a view that shows your project levels (such as an elevation or section view).
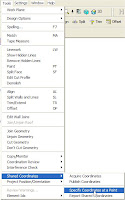
- Click Tools>Shared Coordinates>Specify Coordinates at a Point.
- Select a fixed point in your project (in a view that shows the elevation).
- In the Specify Shared Coordinates dialog box, enter the actual elevation of the point you selected, and then click OK.

Then, change the type properties of the level system family by doing the following:
- In a view showing the project levels (again, such as an elevation or section view), select any level.
- Right-click and select Element Properties from the shortcut menu.
- In the Element Properties dialog box for the Level system family, click Edit/New.
- In the Type Properties dialog, under Constraints, change the Elevation Base value from Project to Shared, and then click OK to close all of the dialog boxes.

The elevation labels will all change to show the true (absolute) elevations.
The following short video shows this procedure in action:

No comments:
Post a Comment